The audio settings tab in Ableton 11 is where you specify the types and quality of audio devices that you use to interface with. This includes internal audio, and external audio. Internal audio refers to audio systems that are built into your computer. External audio refers to external devices that route audio into and out of your computer – for example, an audio interface.
Ableton 11 Manual – Audio settings
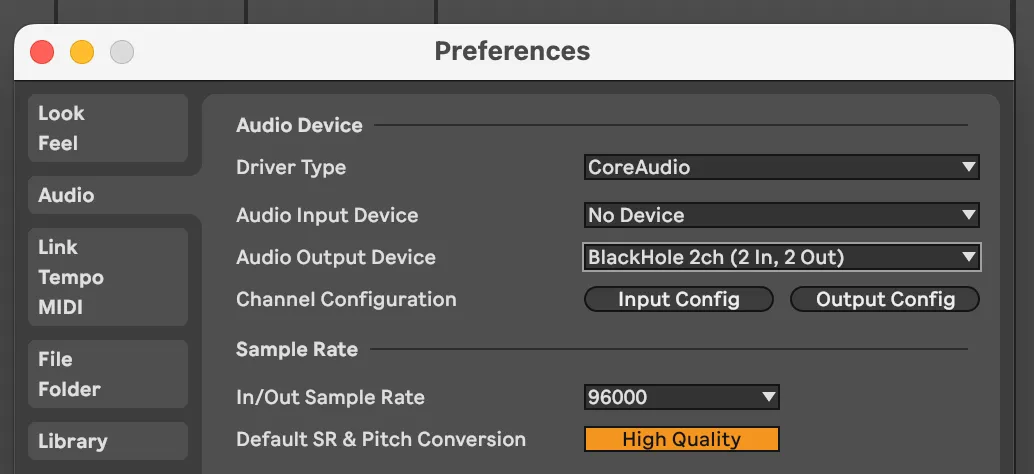
Audio Device

Diver Type
The bridge between Ableton and the interface is the driver which is software usually provided by your operating system or external interface manufacturer. This is how sounds enter and exit Ableton at the most basic level.
Audio Input Device
When you designate an input device, you are informing Ableton that you will be using this specific device as a means of adding audio data to Ableton.
Audio Output Device
The output device is where sound will be routed out of Ableton – this could be directly to your speakers, or to an audio interface where your speakers are plugged into.
Channel Configuration
The channel configuration allows you to specify the exact inputs and outputs Ableton can use, based on the input and output devices you’ve selected. In this example, your device has two input and two output channels. If you had 4 or more channels, they would appear in this section.
Channels are active by default and clicking them will disable them.
If you are working on a device with limited resources, disable channels that you will not use for a slight decrease in CPU load.


Sample Rate

Lets first define sample rate:
Sample rate is basically how many “snapshots” of sound are taken per second when digital audio is recorded. Lets say you are at a birthday party and you take one digital photo ‘snapshot’. The photo gives you information about the party in that single slice of time. Imagine if you had one hundred photos. You could assemble those hundred photos on a timeline of when the photo was taken and have a lot of sequential information that would allow you to visually understand that moment in time more clearly. As the number of organized photos increases, the quality of your understanding would arguably increase. This is similar to how sample rate works in that the sample rate defines the number of ‘snapshots’ that are taken and thus the perceived quality of the sound based on the combination of those snapshots.
When talking about quality – lower sample rates will have less snapshots and higher sample rates will have more snapshots. The sample rate also directly correlates to the file size of the audio that is being sampled – with lower sample rates having smaller file sizes and larger sample rates having larger file sizes.
One other thing to consider is that when you are manipulating audio by applying effects or processing, the amount of data that you have for that particular sound – the sample rate – can factor into the output of the processed audio. If you have less data to work with, there is less data to manipulate. This is an overgeneralization of course.
In / Out Sample Rate
In Ableton 11’s Audio tab, the In/Out Sample Rate setting is basically how many “sound snapshots” are taken every second for both what goes in (your mic, instruments) and what comes out (your speakers, headphones). A higher sample rate—like 96 kHz—captures more detail in your audio, but it also creates larger files and puts more strain on your CPU. On the flip side, a lower rate—such as the standard 44.1 kHz—keeps file sizes manageable and saves processing power. Just be careful: not all audio interfaces support every sample rate. If you pick one your hardware doesn’t handle, you might run into weird playback or recording issues—so it’s always smart to double-check your interface’s specs first .
Default SR & Pitch Conversion
When you import or record audio into Ableton Live at a sample rate different from your project’s In/Out Sample Rate, Live will automatically resample the audio to match your project. You can choose between High Quality or Normalconversion:
- High Quality uses a more precise resampling algorithm (higher-order interpolation), which preserves audio fidelity—especially in high frequencies and when pitching/transposing—but it uses more CPU.
- Normal Quality uses a simpler, lighter algorithm. It’s less demanding on the CPU but may introduce audible artifacts or aliasing, especially in extreme pitch shifts or in high-frequency content .
Similarly, the Pitch Conversion setting determines how smoothly audio clips sound when you pitch them up or down:
- With High Quality, Ableton applies a better pitch-shifting algorithm—reducing distortion and preserving tonal integrity, at the cost of extra CPU load.
- Normal pitch conversion works fine for subtle tuning or minor adjustments, using less processing power.
Latency

Before we go into this section lets define Latency and Buffer.
Latency is the delay between when you press a key and when the sound is heard. Sometimes the latency is so low that there is no perceived delay and sometimes the delay is noticible.
A buffer in audio processing is a temporary holding area where sound information waits to be processed by your computer. When you play notes, the commands enter this buffer, and your computer processes the sound information in chunks. The size of the buffer impacts latency and processing efficiency: a smaller buffer means less delay between pressing a key and hearing the sound, but requires more frequent processing by your computer. A larger buffer allows the computer to process sound in bigger chunks, reducing CPU workload but potentially introducing a slight delay between input and output. The buffer size is a trade-off between real-time responsiveness and computational efficiency.
Imagine you’re playing a digital piano connected to your computer. When you press a key, the buffer determines how quickly that sound is processed and heard. With a small buffer, the sound comes out almost instantly, feeling like a traditional piano – great for live performance but requiring more computer processing power. With a larger buffer, you’ll experience a slight delay between pressing a key and hearing the sound, which reduces the computer’s processing load but might feel less responsive.
Buffer Size
This is the size in steps of your buffer. If you are experiencing issues with the load on your CPU, increase this value. Note that increasing the value will also increase the input and output latency.
Input Latency
The calculated latency for inputs. Directly impacted by the buffer size.
Output Latency
The calculated latency for inputs. Directly impacted by the buffer size.
Drver Error Compensation
This is a subtle but crucial setting in audio production that helps correct timing inconsistencies caused by audio interface drivers. Lets say you are recording a guitar track and working with an audio input device that processes the audio. Ableton will record the data supplied by the audio interface. Imagine that the audio interface processes the guitar data in such a way that it adds to the latency of your system. The extra time that your audio interface takes to process the guitar sound can cause it to be recorded with a noticeable delay in Ableton. Driver Error Compensation accounts for this delay and allows Ableton to record the audio data in the correct location. Again, this is a generalization of what is actually happening and this topic has much more nuance.
Overall Latency
This is a readout of the total round-trip delay your setup introduces—measured in milliseconds. It represents how long it takes for sound to go into Live, be processed, and come out through your interface.
Test

The Test section is basically a built-in studio stress tester—you use it to confirm your audio is actually playing, and simulate heavy CPU loads to help set buffer settings. When you activate Test Tone, all other sounds are muted, and you hear a pure sine wave. Adjust the Tone Volume to a comfortable starting level (usually around –36 dB), and use Tone Frequency to sweep through the range (20 Hz–20,000 Hz) to highlight any speaker, room, or headphone weaknesses. Finally, the CPU Usage Simulator lets you crank up a fake load—say to 80%—so you can tweak your buffer size until the test tone plays cleanly without crackles or pops
Test Tone
A built-in signal generator—when toggled on, it plays a pure sine wave so you can confirm your sound is coming through (and spot any crackling if your buffer size or CPU settings are off).
Tone Volume
Adjust how loud that sine wave is (start low, around –36 dB, then raise as needed).
Tone Frequency
This setting lets you choose which pitch the tone plays so you can check your speakers’ performance or your room’s acoustics.
CPU Usage Simulator
Activating the CPU Usage Simulator forces the CPU meter in the Control Bar to read exactly the percentage you set, simulating that level of load even though nothing else is actually running.
This lets you test how different CPU load levels feel, and tweak settings like buffer size to find a balance between latency and stability. If the Test Tone starts to crackle at 80% simulation this could indicate that you need to increase your buffer size.
Final Thoughts
The audio section does not contain a large number of settings, but these settings are important. Take your time here to understand what you need and select the appropriate settings.
Coming Up Next: Link, Tempo, and MIDI.
Comments
One response to “Ableton 11 Preferences: Audio”
[…] Audio […]